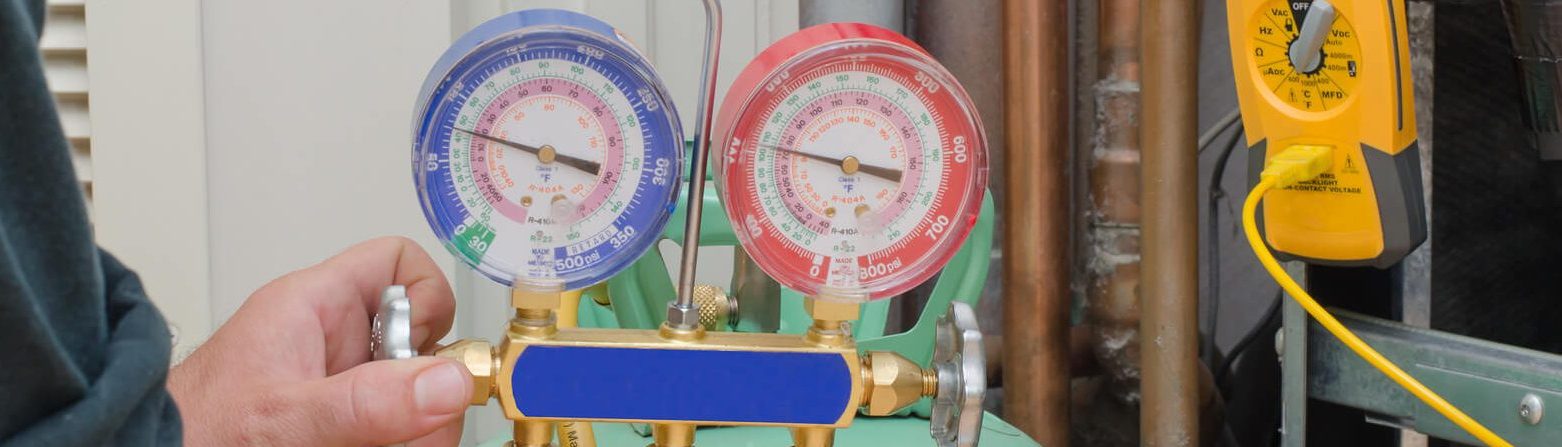
Refrigerant, often called Freon or “gas” for short, is the life blood of an air conditioner. The precise amount and type is machine specific and very particular, but you can do a few simple checks to see if the charge is “in the ball park”.
Too little refrigerant and the unit is inefficient resulting in longer run times and more energy consumption. It is not unusual for systems to develop small leaks over time but they require a qualified technician to repair them. Just “adding gas” is not enough!
 A quick check can help you determine if a system’s refrigerant charge is incorrect, no tools needed! The check is easiest on “split” systems, which accounts for 95% of all residential units. These systems have separate units inside and outside. So-called packaged systems will have everything on one box and may not be as easy to check without tools and know how. So here we go:
Temporarily set your thermostat to a lower temp so the unit will not cycle off while you are checking it.
Allow the unit to run for 4-5 minutes to reach its normal running temperature and pressure balance point before the results of your check are valid.
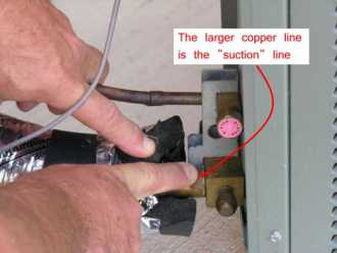
Perform your checks at the outdoor condensing unit: there will be several connections from the house to the unit. At a minimum there will be a large copper pipe a smaller copper pipe and several electrical connections. Be careful not to bend or damage insulation or connections during your checkup.
A properly charged unit will have a wet or “sweaty” suction (return) line. This is the large copper pipe which is typically connected to the unit’s service valve near the base of the outdoor unit. Check the return line with your fingers while the unit is running. The pipe might be insulated with a foam covering so check at the end of the insulation near the valve for a wet and cold line. If it is not cold to the touch or if it is ice-covered, the unit is likely undercharged.
A more complete check is a bit more complicated but still often doable without any tools.:
Locate the compressor which typically can be viewed while shielding your eyes and looking through the running fan on the outside unit.
Position yourself so you can see the copper lines that tie to the compressor’s side. There are at least two lines, one large, one small. The large line is the one you want to observe. If possible, determine if it is wet up to the point of connection with the side of the compressor.
A properly balanced system will have a wet area around the return line about the size of a Ritz cracker after it has been running for a few minutes. If the line is dry or if there is ice on the line or 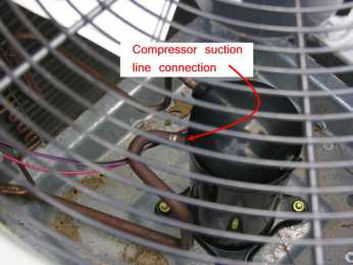 side of the compressor, there is a problem.
Also be aware that too much refrigerant in the compressor will cause damage in time. While overcharging is much less common, it is a good thing to check following an installation or repair. You can check for overcharging at the outside condenser unit.
Again the unit must have been running for 4 or 5 minutes without stopping. A loud compressor or one that sounds like it is “surging or loping” are indicators of overcharging. A solid clue is a really cold or a heavily “sweating” compressor over a significant portion on its side or heavy sweating around the base of the compressor. Look through the top grill to see if the compressor is covered in condensation or ice.
Any of these conditions indicate that a qualified technician needs to adjust the refrigerant levels as soon as possible.